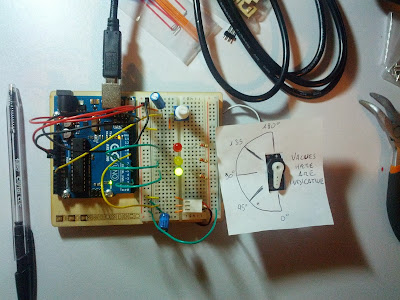
New week, new day, and new post is here.Today will treat the fifth chapter of the manual:
05 MOOD CUE clue people in to how you're doingIn this chapter they introduce how to use a potentiometer, a servomotor and his personal library.
Today I'll explain how to include an external library, how to use map() function to convert a number from a scale to another.
Plus, like every time, some little modifications to the original project.
Start talking about potentiometer: a potentiometer is a type of voltage divider. As you turn the knob, you change the ratio of the voltage between the middle pin and power.
For prevent down of tension, they put, in parallel both to the potentiometer and the servomotor, a capacitor.
When using capacitor, I quote the manual literally, be very careful to make sure you are connecting the cathode (the side with a stripe down the side) to ground and the anode to power because if you invert it the capacitor can EXPLODE. Actually if you invert anode and cathode you can burn down the capacitor, maybe explode is a term a little bit exaggerated but possible imho.
Now, the servomotor. The servomotor usually only rotate 180°. His input is similar to the PWM, as seen in the previous chapter, and he expects a number of pulse that him reads to know what angle to move to.
For generate the pulse you can either write your personal code or use the native library Servo.h included in the IDE. Because the analog pin read values between 0-1023 and the servomotor move between 0-180 , you need to know a new function called map() to change the scale of the values coming from the potentiometer.
For using external libraries you'll first need to import it, with the include keyword.
syntax : #include <libraryname>
Then you must instantiate an object to it.
Syntax: libraryname myObj;
Where libraryname is the name of the library you want to import.Now you can use the functions included in that library by referring to it by the object that you have created.
The function map() also is interesting:
syntax: int map(int scalNum, int minIn, int maxIn, int minOut, int maxOut)
where scalNum is the number to be scaled, minIn an maxIn are the input range, minOut and maxOut are the output range. It will return the scaled value.
The top photo is the circuit built on the board.
Let me talk about the servomotor included in the box: your servomotor come with female connectors, so you'll need to add header pin to connect it to the bread board. The problem is the fact that the header pin included in my box is a crap, with length of his pin totally "casual".
As you can see the short pins are too short and the long pins are too long, with the result that this things do not fit neither in breadboard nor in the female connector. So I use an homemade solution:
As every time, I don't like to follow the project literally, so I added to it something mine.
I use the PWM digital pin to create a visual light sensation of what the servomotor do.
Here the code:
//...other declaration
const int redLedPin = 6;
const int yellowLedPin = 5;
const int greenLedPin = 3;
int redValue = 0;
int greenValue = 0;
int yellowValue = 0;
void setup(){
//...rest of the code
pinMode(greenLedPin,OUTPUT);
pinMode(yellowLedPin,OUTPUT);
pinMode(redLedPin,OUTPUT);
//...rest of the code
}
void loop() {
//...rest of the code
redValue = map(potVal, 0,1023,0,255);
if (potVal<683) {
redValue = 0;
yellowValue = map(potVal, 0,682,0,255);
if (potVal<342) {
redValue = 0;
yellowValue = 0;
greenValue = map(potVal,0,341,0,255);
}else {
greenValue = 255;
}
} else {
yellowValue = 255;
greenValue = 255;
}
analogWrite(redLedPin, redValue);
analogWrite(yellowLedPin, yellowValue);
analogWrite(greenLedPin, greenValue);
//...rest of the code
}


No comments:
Post a Comment